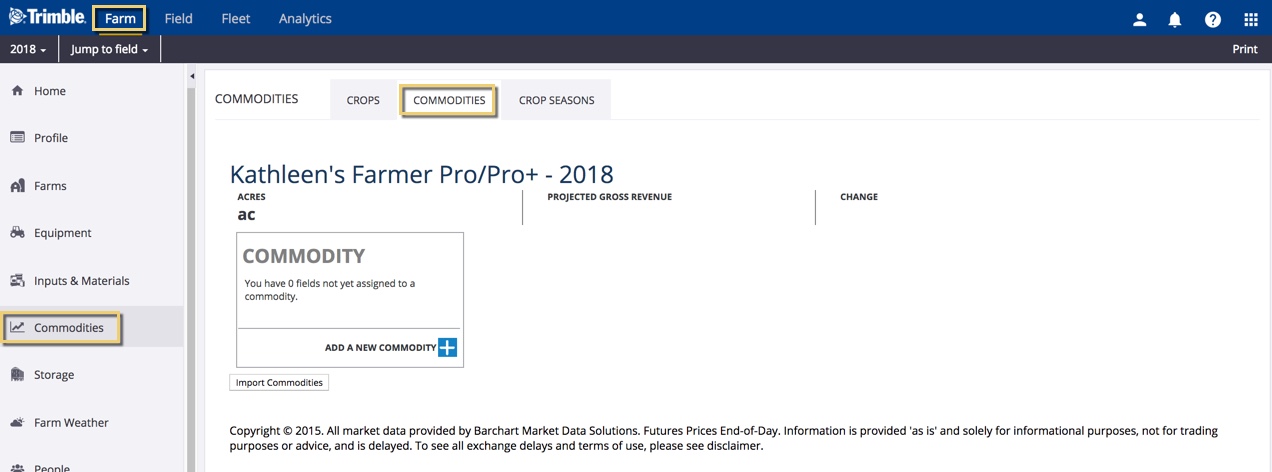
Tracking Commodities
With Trimble Ag Software, you can track basic details for your crops and crop seasons online and on the mobile app, to see real-time forecasted revenues by commodity across your farm and fields for each crop year.
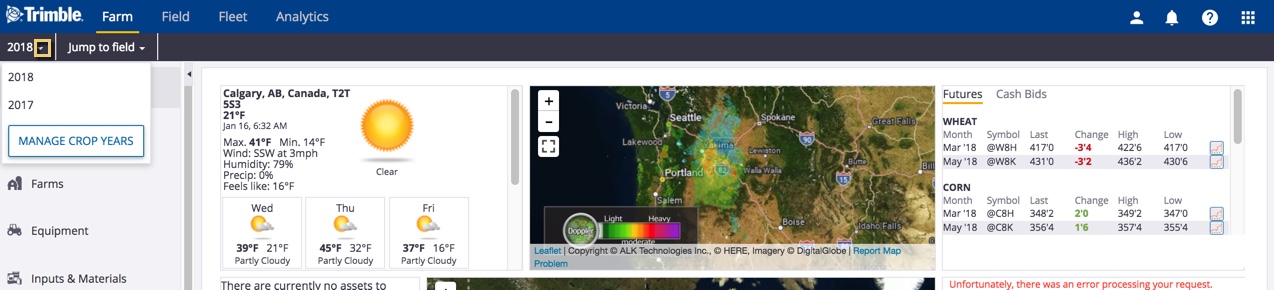
Each time that you login or use your account, you’ll start by selecting your preferred crop year, which will default to the latest crop year saved. The crop year ties your activities and records together under a single point of reference so that you can organize and view information year over year.
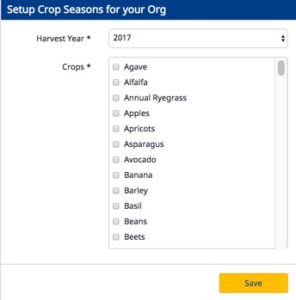
When you first use your account, you’ll be prompted to set up your crop year and primary crop, as shown below (you can change it later, if needed). This initial setup for crop year needs to completed online so that the system can organize your records, and prior to using the mobile app for the first time.
The online account has more options that you can review during initial setup, or change as needed, such as adding additional crop years, adding seed varieties to your purchased materials used during planting, and more. Follow these steps or scroll down to watch our video:
- Log in to your account online (learn more)
- Click the dropdown arrow next to the crop year (top left)
- Click Manage Crop Years
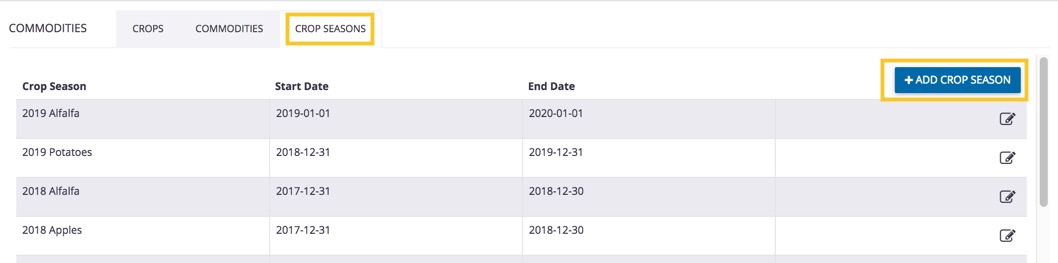
- On the Commodities menu displayed in the main window, click the Crop Seasons tab
- Click the +Add Crop Season button
- On the Create Crop Season pop-up window, select options in each dropdown list or enter changes as needed (required fields are displayed with an asterisk*)
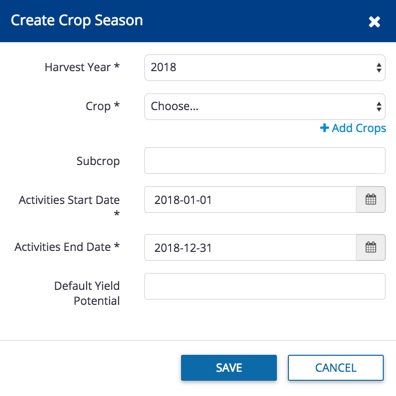
- Harvest Year (required) – also known as crop year; select from the dropdown list
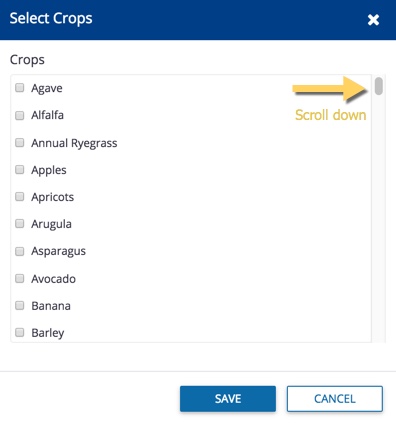
- Crop (required) – select from the list of crops already entered your account, or click the +Add Crops link to select from the master list of crops available in your region
- Subcrop (optional) – enter a name (for example, if your crop is corn, your subcrop could be entered as popcorn)
- Activities Start Date and Activities End Date (required) – click the calendar
 icons to adjust dates (for example, depending on the crop, climate zone and type of activities planned for your operation including soil testing and prep, you can set your own start and end date outside of standard seasonal cycles; as well, if you’re connecting data to your account from vehicle equipment displays that don’t have a crop season defined, these start and end dates are used to match your data to the correct crop season for the field)
- Default Yield Potential (optional) – enter an estimated average crop yield that can serve as a benchmark when comparing crop plans on your account
- Click Save (or Cancel)
For help with deleting a crop year from your account, contact customer support.
Learn more about crops under Tracking Commodities, or watch our video on how to set up your crop year (starts at 3:48):
https://youtu.be/hV57k1b7q2E?t=3m48s
With Trimble Ag Software, you can track basic details for your crops and crop seasons online and on the mobile app, to see real-time forecasted revenues by commodity across your farm and fields for each crop year.
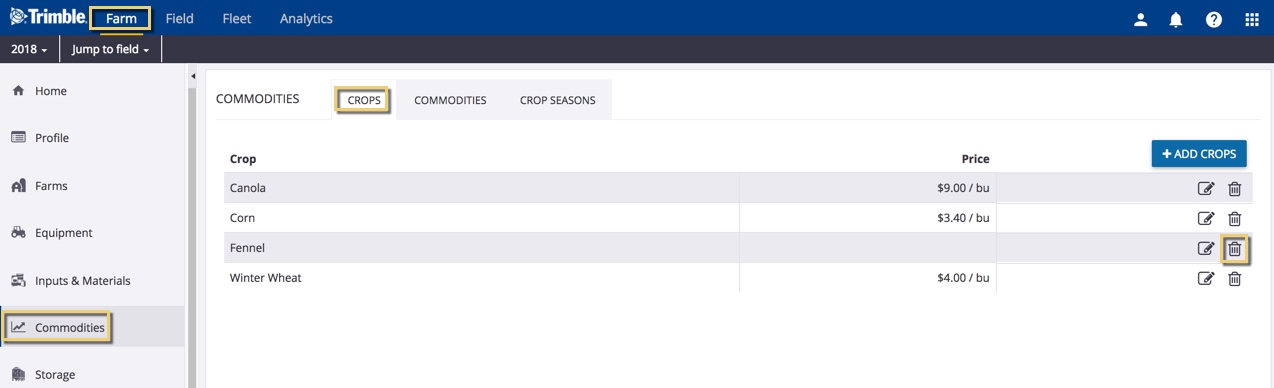
To remove a default crop from your account, simply delete it from commodities tracked for your farm. Fields already created with this crop are not affected; however, when adding or editing fields online, this crop will no longer be displayed in the list of default crop options.
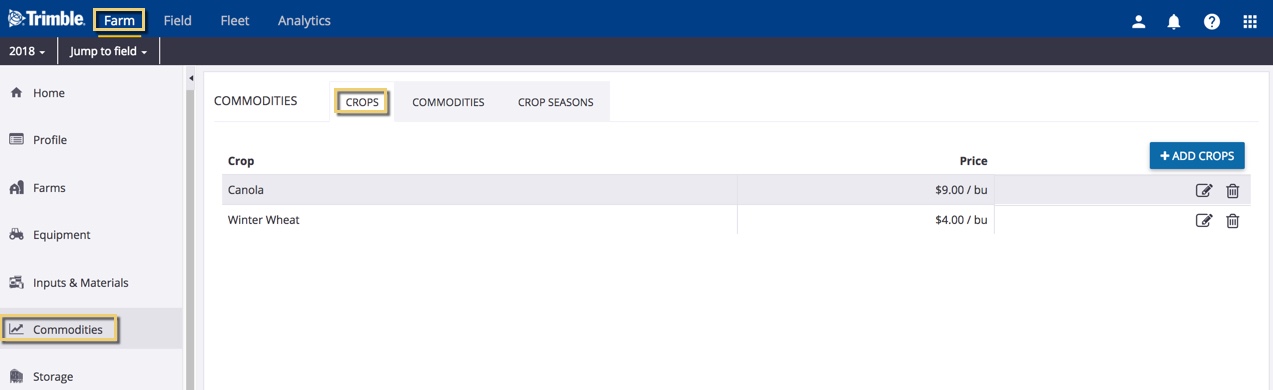
- Log in to your account online (learn more)
- Click the Farm tab (top menu)
- Select Commodities (left navigation pane)
- Click the Crop tab
- Click the delete
 icon
icon
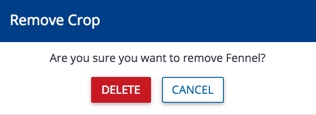
- Click Delete to confirm your change (or Cancel)
The online Marketplace within Trimble Ag Software is your one-stop shop for add-ons and upgrades, as well as free modules included with the purchase of your software. Choose whether to activate and use free features that work for your farm business, or hide them from view. Contacts with access to your account will only see the online and mobile features for modules that you activate.
- Log in to your account online (learn more)
- If you have more than one account, select your Purchasing Organization from the person
 icon on the top right
- Click the Farm tab (top menu)
- Select Marketplace (left navigation pane)
- From the Marketplace tab, scroll down the page to view all tiles
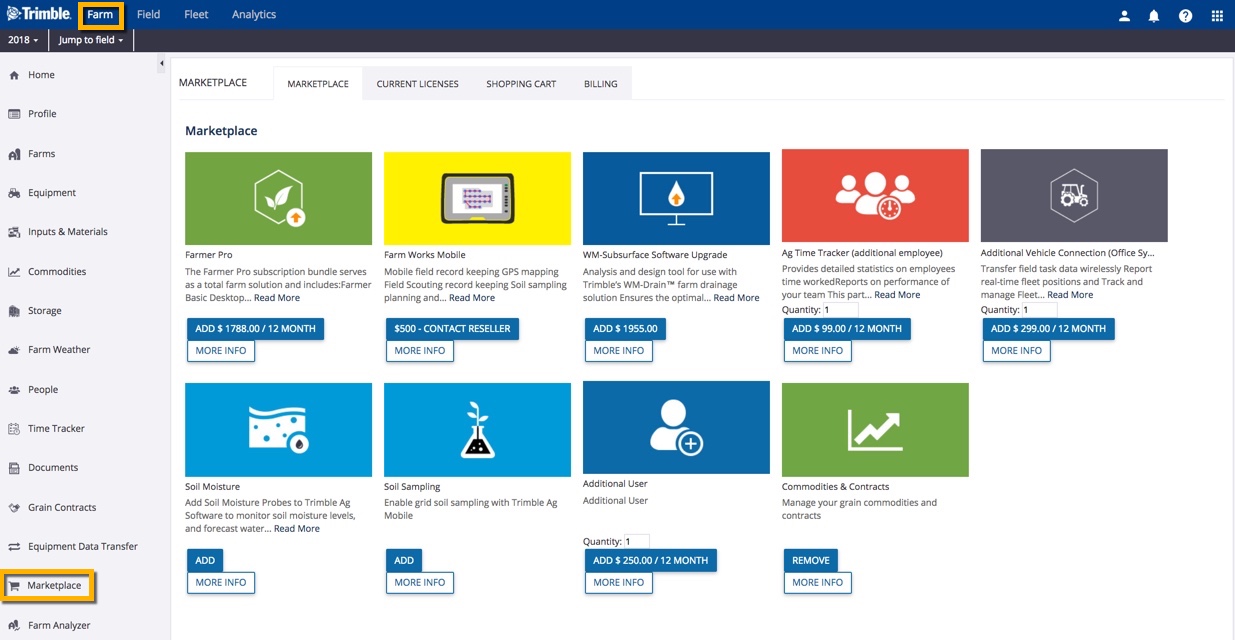
- Click Add (or click More Info for details including the option to Add), which then returns you to the dashboard (home page)
- Check that contacts also have the relevant mobile security permissions enabled (new mobile features will be visible after the mobile app is synced
 with the online account)
That’s it! The free module has been activated. To turn it off again, return to the Marketplace and click Remove (or click More Info with the option to Remove). Any information already set up in your account for the related module will be hidden from view until the free module is activated again.
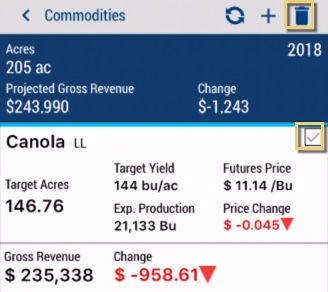
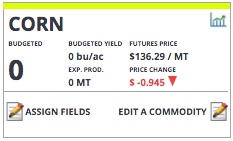
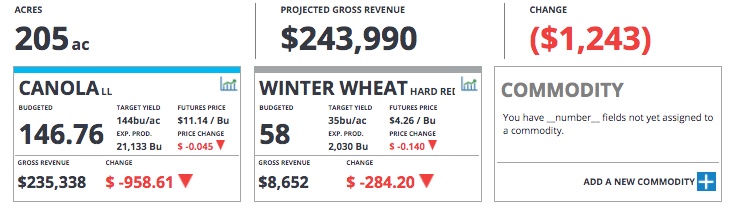
Set up and view your commodities on the mobile app when you’re on the go, with features similar to online commodity tracking within your Trimble Ag Software account. Keep tabs on revenue forecasts for specific crops, edit commodity details, and see how each rolls up to the mobile Market Position Sheet by crop year.
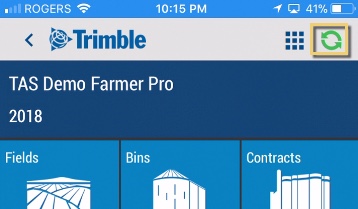
- Log in to the mobile app with the same Trimble ID used to access your online account (learn more)
- From the mobile app’s home screen, select the preferred crop year (top left)
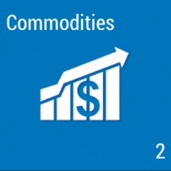
- From the home screen, tap the Commodities tile (Not seeing anything? Activate this free module in the online Marketplace)
- Tap to open a commodity tile
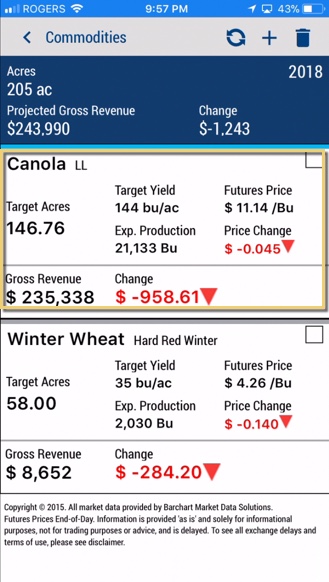
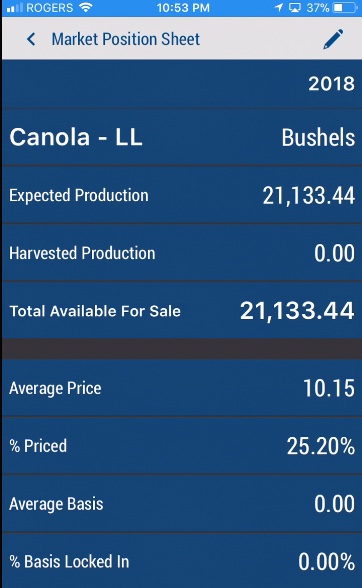
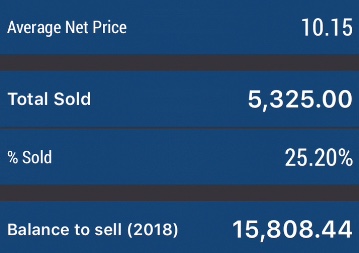
- On the Market Position Sheet screen, view the details or tap the pencil
 icon to edit this commodity
- On the Commodities detail screen, tap to enter or select new options
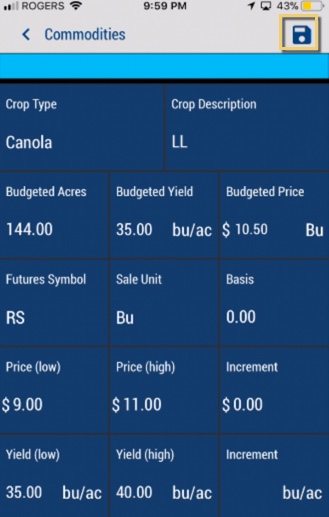
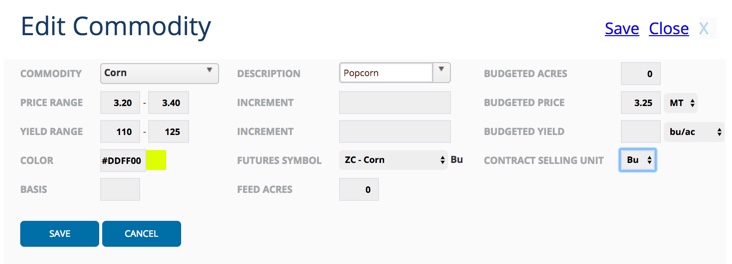
- Crop Type (required) – select from the master list of all crops, or frequent crops used on your farm (this crop is not the same as Crops entered under Commodities online; this entry is equivalent to Commodity in online tile)
- Crop Description (required) – select a subcrop from the master list (equivalent to Description online)
- Budgeted Acres – enter the number of acres in your field (auto-populates with boundary area if online tile is connected to fields)
- Budgeted Yield (required) – enter a conservative (low) estimated yield, and select the unit of measure to match above
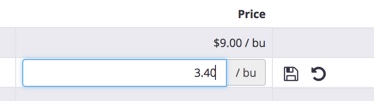
- Budgeted Price (required) – enter a conservative (low) estimated selling price and select the unit of measure; value is used in online graphs
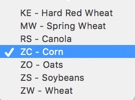
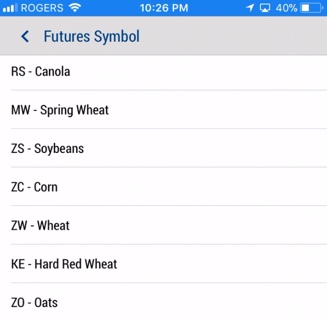
- Futures Symbol (required) – select from the list of traded stocks (matches online options):
- Sale Unit (required) – select the selling unit to match the unit of measure on the budgeted price and budgeted yield (equivalent to Contract Selling Unit online)
- Basis – enter a basis amount used to offset futures selling price
- Price (low) and Price (high) – enter a minimum and maximum expected sale price (equivalent to Price Range online)
- Increment Value – enter a dollar value for selling price as commodity moves up or down; value is used in graphs (equivalent to general Increment online)
- Yield (low) and Yield (high) – enter a minimum and maximum possible yield rate; values are used in online graphs (equivalent to Yield Range online)
- Increment Units – enter a number of units of change as commodity moves up or down; value is used in online graphs (equivalent to general Increment online)
- Note: the following online values are not available on the mobile app
- Color – optional color when viewing a commodity tile online
- Feed Acres – optional area designated for feed crop (not for sale)
- Click the disc
 icon to save changes
- Click the < back arrow at the top of the screen to return to the Commodities summary screen
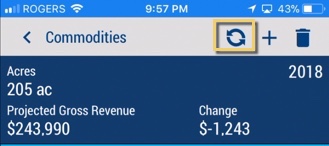
- Click the sync icon to view updated commodities summaries
- Sync changes with the online account when you’re within cellular or wi-fi range, by returning to the home screen and tapping the green sync icon (top right)
More options:
- Add commodities – from the Commodities summary screen, tap the plus
 icon to add a new commodity tile (continue from step 6 above)
- Delete commodities – from the Commodities summary screen, tap the check box select one or more commodity tiles, then tap the delete icon (caution: no warning message appears; this action is final)